
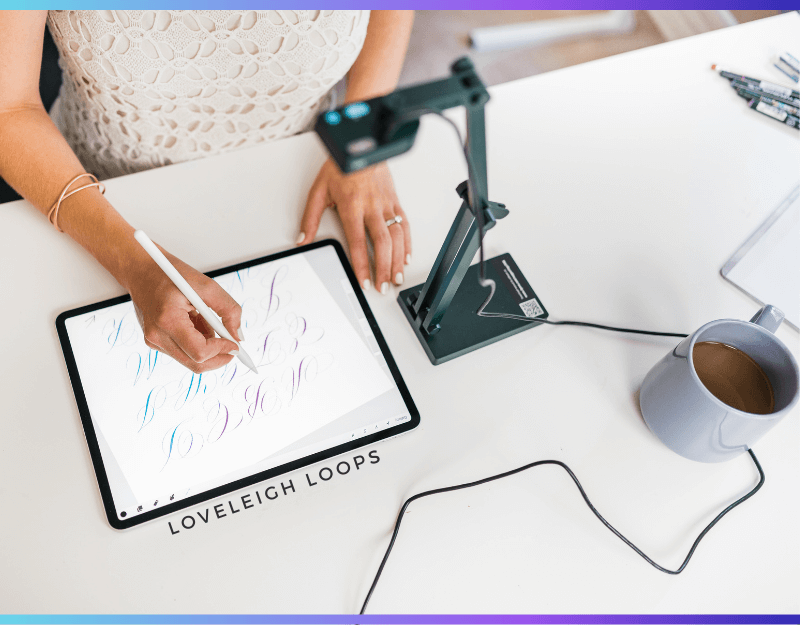
iPad Flourishing Video Tutorial + Comprehensive Guide
Have you ever tried adding flourishes to your digital lettering?
If you're new to iPad flourishing, or calligraphy flourishing in general, you'll come to realize that adding flourishes to a composition is not as simple as adding swirls onto all of your letters.
There are easy ways to draw flourishes, but without a clear idea of the style you want, getting it to look right on the screen is difficult.
So today, we'll show you how to add draw flourishes like a lettering artist (WHILE having fun!). Have your iPad handy so that you can implement the right away!
Let's dive in.
Save it for later! ↓
Table of Contents
What Is Flourishing?
When you search for examples of calligraphy on Pinterest or Instagram, you're often presented with words surrounded by elegant, grandiose extensions that make the letters and overall calligraphy composition look more beautiful. What you're seeing are flourishes!
Flourishing is the act of extending a line with loops or curves.
Any word (but NOT always every letter) can be extended by flourishing and it's one of many fun techniques to enhance your calligraphy.
This guide will focus on how you can start flourishing on your iPad today, but if you want to dive even deeper into the theory behind flourishes, check out our complete calligraphy flourishes guide.
We also cover the basics in our calligraphy flourishing video:
Why Is Flourishing So Difficult?
Over the years we've taught thousands of students how to write flourishes on both paper and iPad, so we're familiar with the struggles of going from zero experience to being a lettering pro.
It's a surprise for many new lettering artists, but the process of flourishing your letters is not as effortless as it looks. Beginners face two main problems with flourishing:
Placement: Where do you add them?
Shape: What will they look like?
With the right tutorial (cue us waving!), flourishing is completely approachable, and choosing the easiest medium to practice will make your learning experience even smoother.
That's where iPad lettering comes in.
You may also like: Traditional Calligraphy Flourishing Tutorial
Why Use An iPad For Calligraphy Practice?
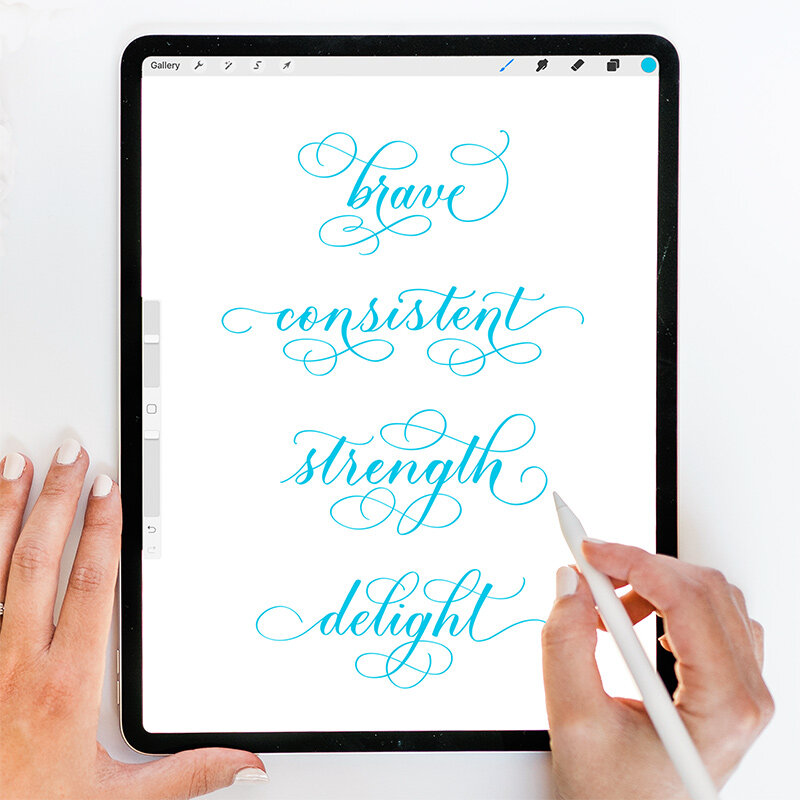
Since the release of the Procreate app, iPad calligraphy has become extremely popular, and for good reason!
There are huge benefits to taking your calligraphy digital. With the Apple Pencil, you have a fully customizable calligraphy pen with enough pressure sensitivity to be able to mimic a brush pen or even a classic nib and ink.
You can access countless Procreate brushes to create any calligraphy style, even traditional styles like the Spencerian script.

While you do have to learn some basic settings, the Procreate app is a lettering tool that gives you unlimited space to practice, WITHOUT having to burn through page after page of practice paper.
Are you new to iPad calligraphy? If you're not sure which iPad to get or if you should buy an iPad Pro to have the best experience, check out our complete guide on iPads for lettering!
Benefits Of iPad Calligraphy Practice
Unlike practicing the basic strokes, working on your flourishing skills isn't a simple matter of just building muscle memory. Instead when you flourish, you're flexing the creative muscle and learning how to make decisions that result in a more beautiful composition.

iPad flourishing before and after
Since every composition is different, flourishing from scratch requires a lot of trial and error.
While flourishes are traditionally written on paper, there's a huge benefit to learning on the iPad. Each iPad (whether you get the basic model or the iPad Pro) comes with a certain set of features that make life so much easier for a budding lettering artist!
You may also like: 8 Basic Calligraphy Strokes
The Eraser Tool
Say hello to your new favorite Procreate tool! It takes many attempts to get a design just right and the eraser tool on the iPad lets you tweak and perfect as much as you like.
Undoing a stroke is also fast and easy in the Procreate app, which is one of its big draws for a new lettering artist. The default Procreate shortcut allows you to undo by simply tapping two fingers on the screen.

Save Your iPad Flourishing Designs
The Procreate app isn't just perfect for practicing flourishes; it's also an easy way to store and save your designs.
Rather than trying to remember how to flourish a certain letter, you can save your most successful compositions to create a collection of past ideas to work from. Your work will never get lost, have the ink fade or get accidentally ruined.
You may also like: How To Celebrate World Calligraphy Day
Edit Existing Pieces
With the Procreate app, a composition never has to be retired. Even after you've created a beautiful quote or a design, you can circle back to it days, weeks or years later and it's perfectly preserved and ready to be worked on again.
Try a different background or experiment with different letterforms. You can even try out different ways to flourish each letter once you have more experience!
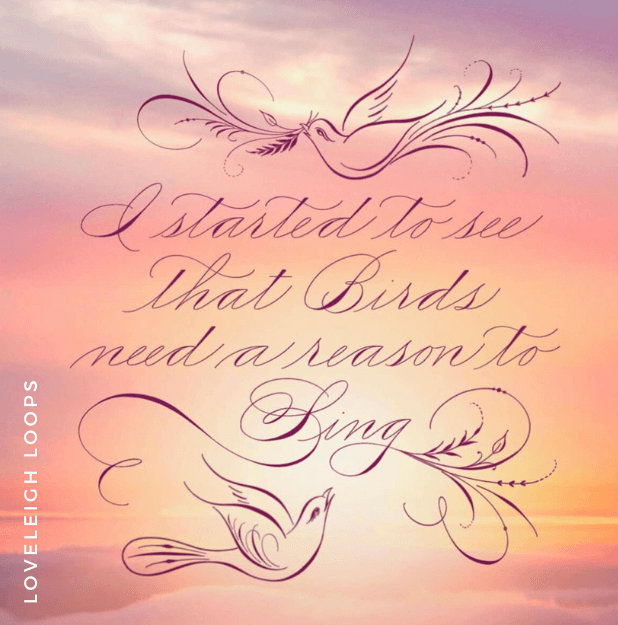
Here's some inspiration of what some advanced flourishes and create background choices can bring to a composition.
You may also like: Calligraphy Course Directory
How To Flourish On The iPad
Let's start this tutorial by giving away a huge secret: remember those people that do calligraphy on Instagram?
Well, they're not winging it. In fact, they've probably planned out their whole design.
The dotted lines are our flourish stamps.
The big secret to flourishes is to plan ahead based on which basic stroke you're flourishing.
For this to make sense, it's important to understand a few fundamentals of flourishing:
A flourish is an extension of one stroke in a letter
Not every stroke should be flourished
Flourishes should never create confusion
Learn more about each of these in our deep-dive flourishing guide.
Let's take a moment to take a closer look at this process of mapping out your opportunities for flourishing by looking at each word in the phrase happy birthday.
Step by step we'll start adding embellishments until we arrive at a nicely balanced quote.

Want to learn EVERYTHING there is to know about flourishing? Then our course Flourishing Fundamentals is perfect for you
Step 1: Choose And Write A Phrase On A Blank Layer
The first step to writing your flourished word is deciding on a quote or phrase that you want to practice with.
Here are some short phrases that have easy flourishing opportunities:
Thank you
Never stop learning
Happy birthday (this is what we'll use for our sample)
Write your base word using basic letterforms on a blank Procreate layer and we'll add embellishments together from there.

Write your base word first
New to calligraphy and not sure how to write the basic letterforms? We've already written these words as a template so you can trace them - they're in our flourish stamps pack. Or, download our free basic calligraphy strokes worksheet and write your own word!
Step 2: Create A New Layer Below Your Writing
Create a new blank layer below your lettering in Procreate.
If you need some help navigating basic Procreate settings, watch our beginner Procreate video:
Then, let's look for places where we can embellish our lettering.
Step 3: Look Critically At Placement
The choice of deciding where to draw each flourish is one of the most important decisions a lettering artist makes, and making these decisions before you begin to write saves you an incredible amount of time.
Why? You can draw the most BEAUTIFUL embellishments, but if they're poorly placed, no one will be able to read them.
When deciding where to flourish, be aware of these 3 basics:
Empty space: Are there any spaces that seem empty and can be filled with a flourish?
Spacing: Do your flourishes make the piece feel balanced, or are they leaning towards one side? Are they spaced out enough?
Readability: Are any curves and loops interfering with the readability of your piece?

Examples of poor flourish placement that interfere with legibility
The iPad is perfect for practicing and experimenting with this lettering technique because you have tools that allow you to undo, rearrange and tweak your placement until it's perfect. Here's how you do it.
We're going to write out the steps below, but you can also follow along with our iPad flourishing workshop video.
Step 4: Choose A Procreate Brush To Mark Placement
At this stage, we're looking to mark open spaces within the composition where we can add some extra loops and curves.
We'll highlight those areas using a Procreate brush. There are thousands of Procreate brushes to choose from, but for this step of our lettering tutorial, we're choosing a simple soft brush from the airbrushing section.
While you need to download a pressure-sensitive Procreate brush to do digital calligraphy, you don't have to worry about it at this stage.

Tap the Procreate brush library icon, then airbrushing, then soft brush
Now that you have your Procreate brush selected, let's look at some spots where we can flourish!
Step 5: Mark Those Areas
When looking for letters to flourish, there's an important principle to keep in mind: your goal is to fill up empty space by extending letters rather than completely altering them.

The 5 key spots to add flourishes to your letters
Any part of letters that can be extended presents an excellent place to flourish.
For starters, look for the following parts of letters:
Ascending loops
Descending loops
T-crossbar
Entrance strokes
Exit strokes
Pro tip: We have a letter-by-letter guide to choosing flourishes based on each stroke and letter in our iPad flourishing stamp pack.
Create a new layer. Then, mark the empty areas where you want to extend using your soft brush. You can do this in any color, here we're using yellow:

Select your flourish areas
Step 6: Outline Embellishments
Now that you've selected the perfect spots for your loops and lines, it's time to work on the designs themselves.
You'll soon realize that even though you may have a simple idea for a simple design, getting it just right often means drawing the lines over and over again. Tip: redoing the flourish to get it just right is also a great way to get in some repetition and practice.
Consider the following tips to practice your iPad flourishing:
Base your decorative loops on the oval shape and avoid sharp angles.
Avoid crossing two thick lines. Just like calligraphy, a flourish consists of thick and thin strokes. You can also just stick with think strokes.
Cross lines close to a 90-degree angle. This ensures your flourish designs don't look flat or squished.
With these principles, you're all set to start flourishing!
Outline your flourishes on their own layer and draw them over and over again until you get the shapes right. It's okay to use different colors at this stage because this is just your outline and it's not actually your final composition.

Outline your flourishes
This process can take a surprising amount of time, so be patient and try to have fun!
Pro tip: Always start a new layer for every element of your lettering. Keeping everything on its own layer is a best practice that makes your lettering organized and easier to edit.
Once you're happy with your outlines, it's time to draw the final flourishes for your composition.
Step 7: Draw And Finalize
Finally, create a new blank layer in Procreate above your draft quote.
Now choose one of your favorite Procreate calligraphy brushes. Make sure to choose a pressure-sensitive brush that can create both a thick and thin line.
Trace over your base word and the flourish outlines to create one smooth composition.
And just like that, our word happy is flourished!

The word “happy” with flourishes
You may also like: “Happy Birthday” Tutorial In Calligraphy
After you've gone over the different letters, take a moment to look at your quote. Is there any interference with legibility? While each individual flourish might work, do they work together as a whole?
There are actually faster ways of creating this effect, which we'll demonstrate on the word "birthday."
The secret is our iPad flourishing stamps.
iPad Flourishing Stamps
As you'll quickly see as you practice, designing a unique flourish is more complex than it looks on the surface. This is why we've put together our iPad flourishing stamps pack:

Review of our flourish stamps
Think of stamps as a form of flourish planning done for you as a traceable guide.
This stamp pack is perfect if you:
Are new to calligraphy
Need some new ideas to get unstuck
Feel like you always use the same 2-3 flourishes
Let's finish the rest of our “happy birthday” quote with our stamp pack to see how it looks!

How our flourish stamps work
Step 1: Mark Flourish Areas
This is the exact same process that you went through with the word "happy."
Step 2: Choose Your Flourish
Instead of drawing a unique flourish from scratch, our stamp kit comes with pre-made flourish stamps.
With these stamps, you can:
Use the flourish as it is (gain muscle memory by tracing)
Or, use it as a starting point to create your own unique flourish

Letter “y” flourish variations
We've made 60+ flourish options in this stamp pack, which can all be downloaded into your Procreate brush library.
Here we’ve applied different stamps to the letters b, r, h and y:

“Happy birthday” flourished with our flourish stamps
Included in the iPad flourishing starter kit is a cheat sheet that lists the options to flourish each letter.
Step 3: Trace Over Stamp
Your stamp provides a dotted line for you to trace over as a guide, now all that’s left to finish your composition is to write the word with the flourish on a new layer.

Final composition
Flourished Alphabet
A fun exercise to try is flourishing the alphabet.
Write each letter in a basic style using our free color-changing Procreate brush, and then add a variety of Flourish Stamps on the letter bases:
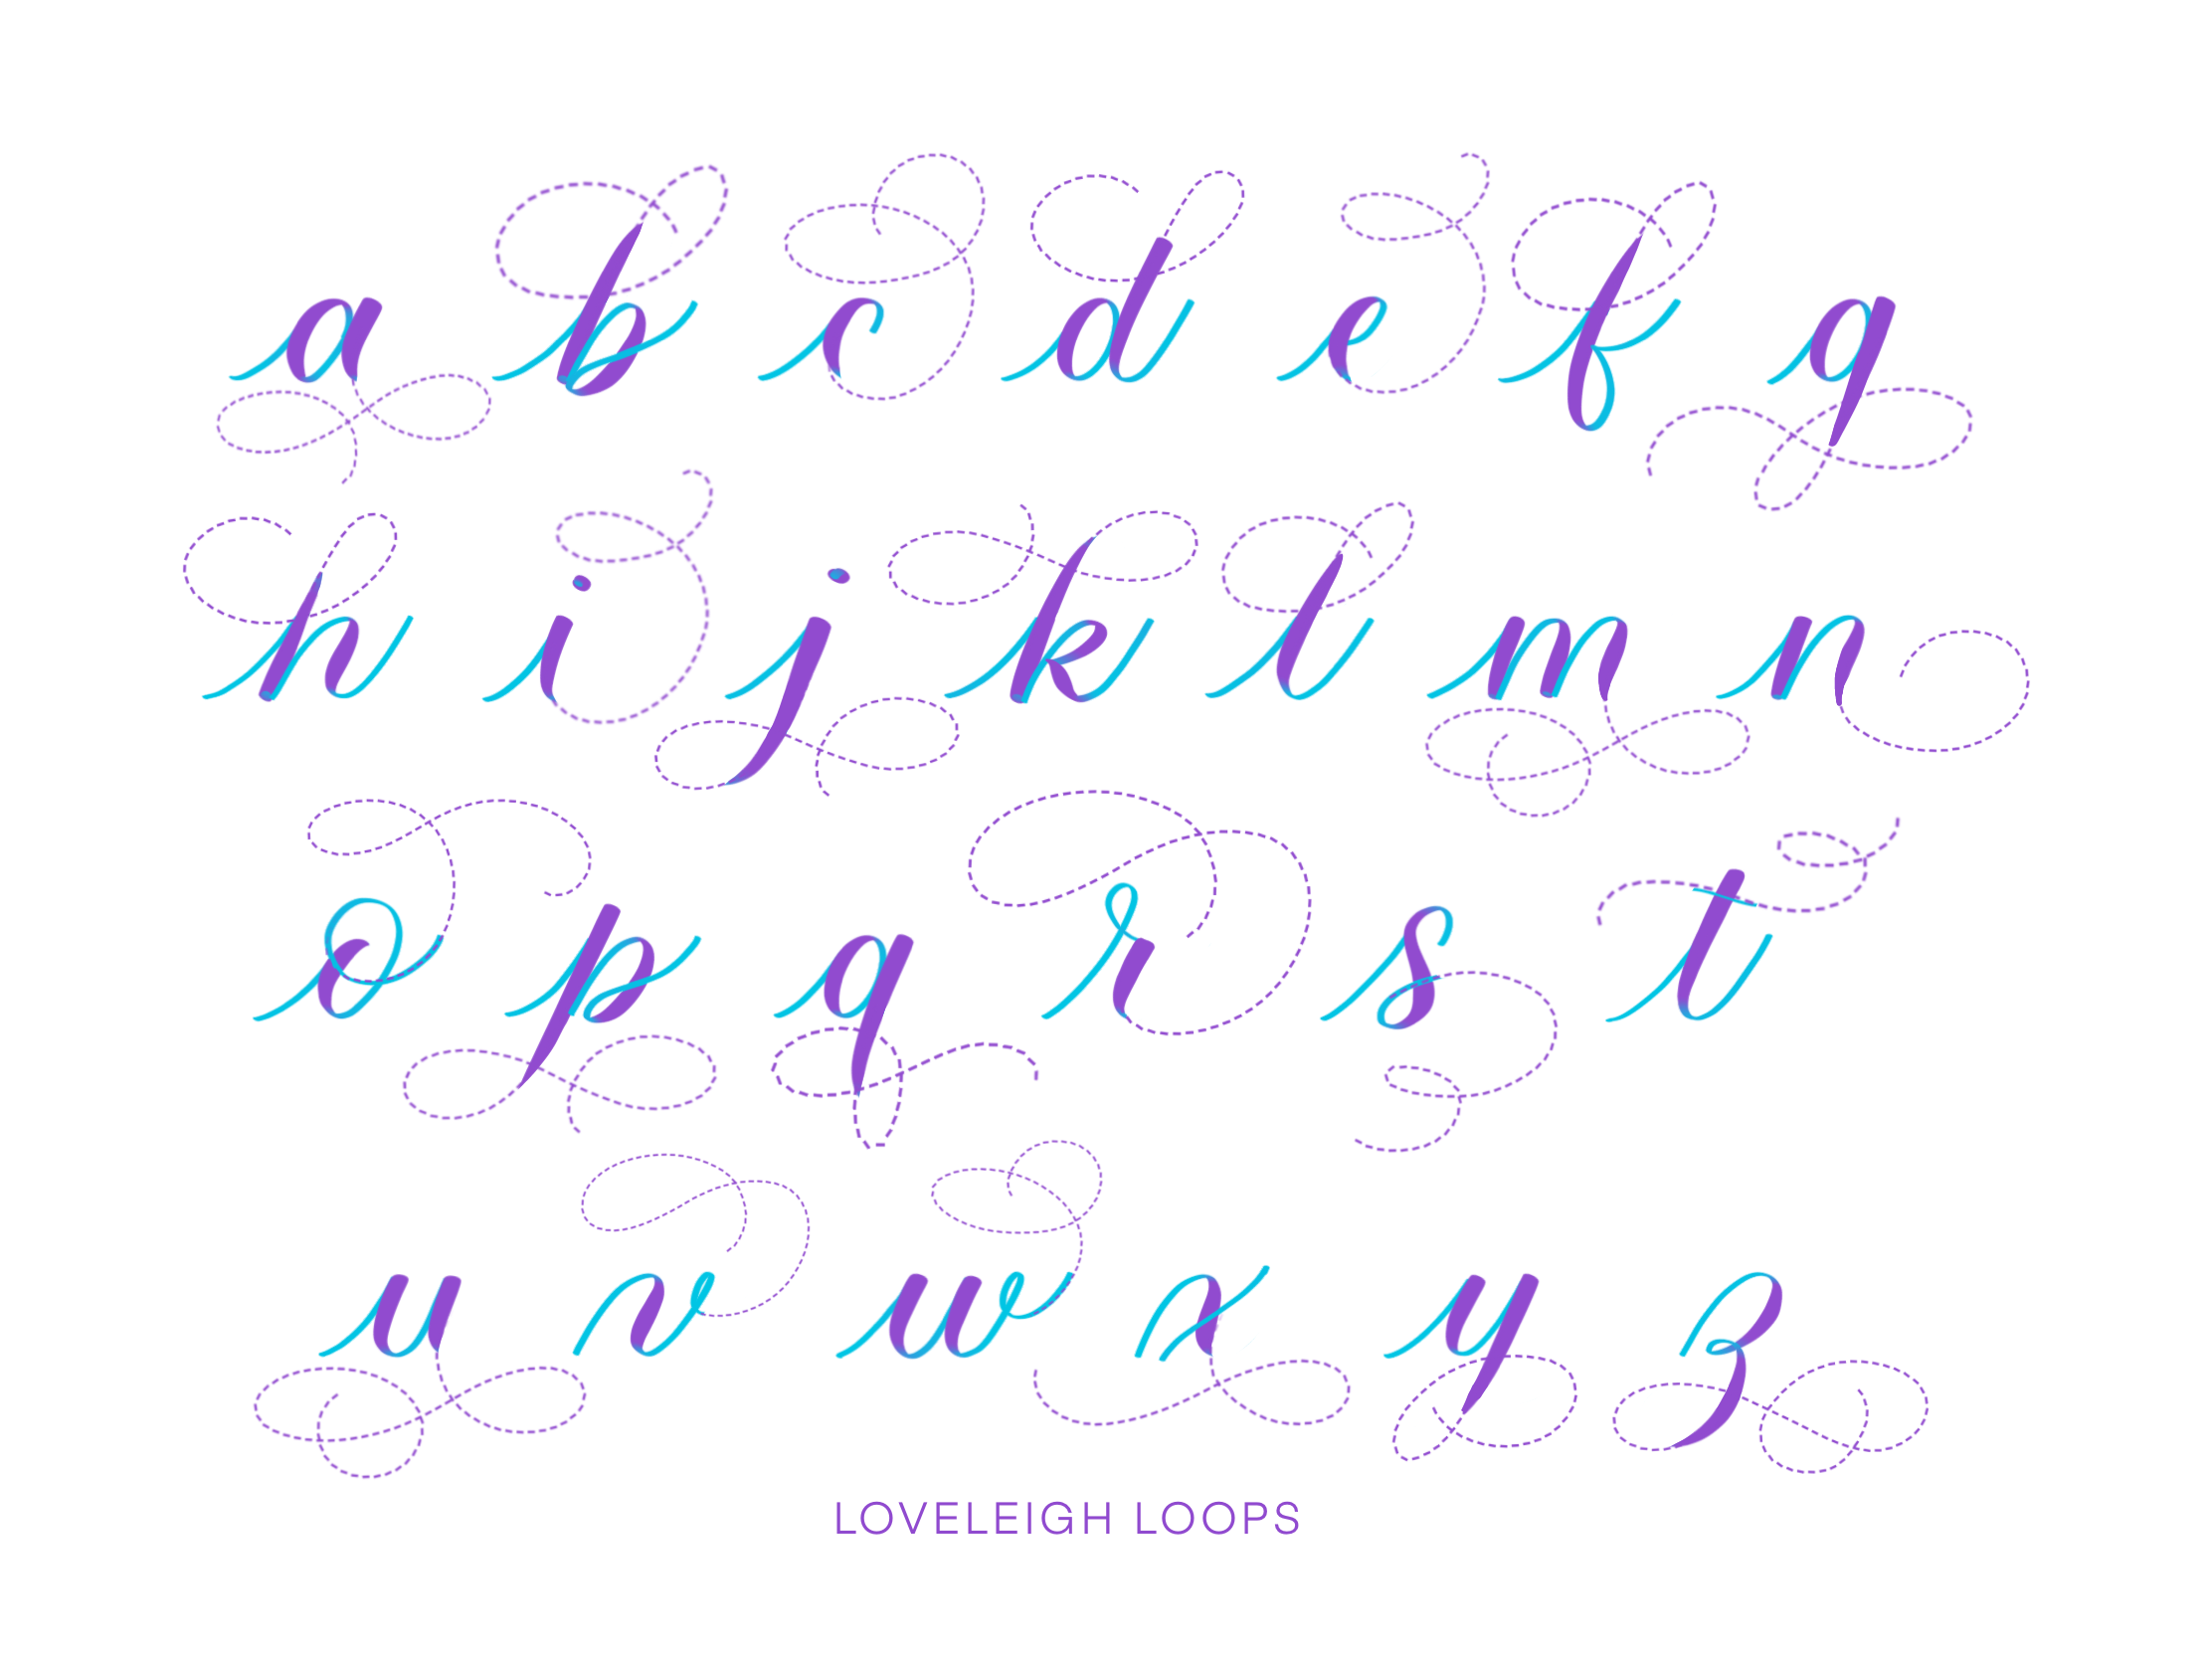
Use the Flourish Stamps for Procreate to easily add flourishes
Final Thoughts
Where will you feature your calligraphy flourishes? In your digital planner or in your artwork online? Whatever you do with your art, we hope that you had fun learning this new lettering technique.
Flourishing is a gorgeous lettering skill that, once learned on your iPad, can be translated to any form of creative work: writing paper and ink lettering compositions, drawing in your paper planner, or you can even flourish with paint if that’s your expertise!
Jillian writing the alphabet with flourishes in Procreate
There's no creative limit to this lettering style, and we're SO excited for you to experience it.
We know that becoming an iPad pro and the lettering artist that you want to be can feel like a long road.
We hope that you'll make yourself at home here at Loveleigh Loops and dive into more of our other fun (and free!) iPad calligraphy resources:
The Loveleigh Brush: A free Procreate brush custom-made (by us!) for writing calligraphy on your iPad
iPad Calligraphy Basics: A free online course teaching you Procreate from scratch
Intro To iPad Lettering Facebook Group: An entire free Facebook group full of new friends, resources and inspiration
Or if you're ready to make a bigger investment, try our paid iPad calligraphy and lettering resources:
Procreate Lettering Brush Pack: 27 custom-made Procreate brushes specifically made for lettering and calligraphy
Procreate Lettering Projects: Follow along with us as we teach you 20 gorgeous lettering compositions step by step
Make Your Own Procreate Brushes: Learn exactly how to make custom Procreate brushes to bring your lettering to life
You're going to be an iPad pro in no time! Please share your progress with us online by tagging us @LoveleighLoops so that we can cheer you on.
